


Union Riveter Krissi Sandvik is sharing her most popular tutorial of all time today! "Image Transfers" are a great way to layer ghostly images in your mixed media pieces, collages and polymer clay, they can be used as inclusions in resin jewelry and are a great way to transfer printed text to your work. There are multitudes of image transfer techniques that use various printers, transparencies, solvents, Polaroid photos... the list continues to grow. This is one of Krissi's favorite techniques - it's cheap, quick and easy! (originally published by Krissi's Art Studio on 2/17/2010)
Almost every single one of my mixed-media pieces has some kind of an image transfer in it. Some are gel medium transfers (we'll do that another day, OK?), but most are packing tape transfers. I prefer them because they are FAST and really easy. If you goof up, you don't have to wait hours to fix your mistake. Packing tape is also great for transferring text onto just about any surface you can imagine.
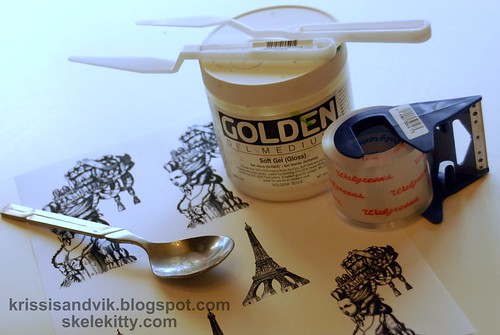
You will need:
- laser printed* graphics** or text
- brushes/spatulas
- clear packing tape
- a bone folder or spoon
- gloss gel medium in soft or regular (I prefer regular for uneven surfaces)
- scissors
- a small bowl with water
- paper towels
**IMPORTANT: NEVER EVER use copyrighted images (especially if they're mine).
Place a piece of packing tape carefully over your printed image. Avoid getting wrinkles or bubbles in or under your tape.

Using your bone folder or the smooth side of a spoon, burnish (rub!) the tape to ensure complete contact between the ink/paper and the adhesive.

Tear away the extra paper from the edges of your tape, turn your image over and peel away some of the paper from the back. You do not need to peel off all of the paper, but removing some will help the water to penetrate and will make your life a lot easier about 2 steps down....
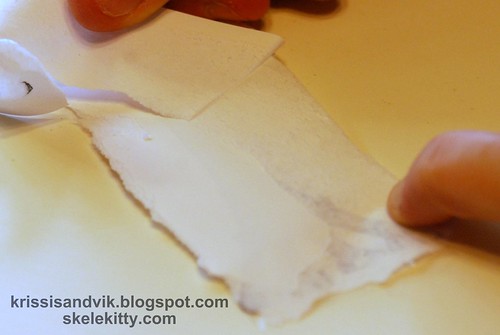
Submerge your image in a small bowl of room temp/cool water for a few minutes (5 to 10 is usually good, but if you forget it for a couple of hours, don't panic - it's all good).

Using only your fingers, gently rub the paper until it starts to pill up. Continue to rub at all of the paper residue until it is completely gone. Your tape will not be crystal clear, but you should not feel any rough spots or bits of paper left.
Once you have removed all of the paper residue, let your tape dry on a paper towel.

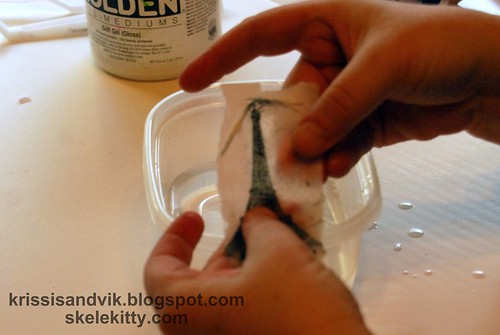
Trim up your image and do a dry fitting. Trim more if needed.

Spread a generous amount of gel medium on your working surface and brush some on the back of your image/tape.
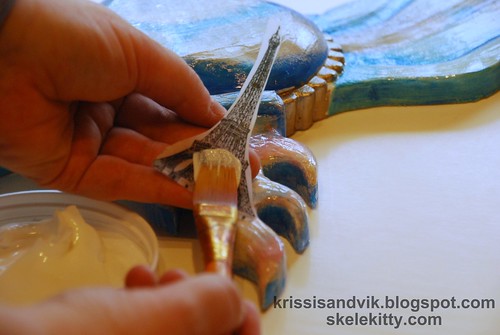
The tricks (and the part where you get messy!):
- Place your image on your working surface and put a little gel medium over the top to reduce friction.
- Using your fingers and starting from near the center of your image, press down gently, but firmly and rub out any bubbles.
- Continue to press and rub firmly working outward so that all of the gel medium is pressed out from under the tape (you'll be able to tell when there are no white spots under the tape).
- Run your fingers around the edges to ensure complete contact. You are going for as close to 100% contact between the tape and your working surface as you can achieve.
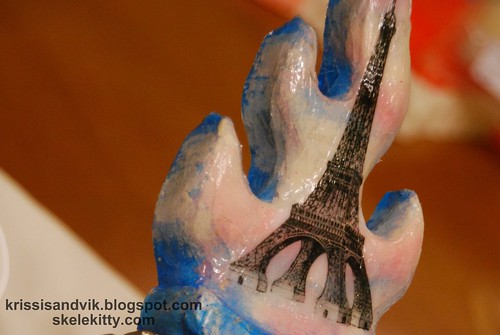
Troubleshooting tips for working on an uneven surface (like this lovely plaster heart here carved and mold poured by my pal and all around nice dude, Cesco). If you are working on an undulating surface, you may not be able to achieve 100% contact between the tape and your piece. So, here's what you do:
- Lifting beneath the image
- Change your uneven surface into an even surface by adding gel medium and leveling it with a credit card or the edge of a spatula. Let it dry, then start over with a new transfer (you don't want all the old gel medium gunking it up).
- Follow the instructions above, but use the side of your finger to press out the extra gel medium from beneath your image. You will see white spots of gel medium where your image was previously lifting. Pretend you don't see them. Your drying time will be increased, but your image will be perfectly adhered in the end.
- Lifting at the edges
- Since tape will not stretch to follow curves, try trimming the edges of your image if that is where the lifting is occurring
- A trick I learned for sewing curves: Rather than trimming away excess tape, try snipping inward toward your image in the problem area.
- Use a trick similar to #2 under Lifting beneath the image - use light pressure around the edges and allow gel medium to take up the space between your tape edges and your working surface.
- Did you do a dry fitting? Really? Are you sure? I don't think you did. Either that, or you were in denial and thought this would fit (silly you). Go back and resize your image and try again WITH A DRY FITTING THIS TIME.
 |
| Trick #2 for keeping the edges from lifting: snip inward toward (not into) your image |
To finish: Add a generous layer of gel medium over the top of the image to blend away the edges of the tape. Your image will look cloudy/milky at first. Let it dry. Drying time can vary from a few minutes to a day or two depending on thickness of gel layers, porosity of your working surface, temperature and humidity.

Now GO FORTH AND TRANSFER THY IMAGES!
Here's a pic of the winged sacred heart I'm creating for my ol' school pal, Sam. It's still in progress, but you can see several other tape image transfers (my apologies for the messy photo background).

Other stuff you can do with packing tape (I'll continue to update this as ideas come to me):
- Using rubber stamps and Staz On (solvent based) or Archival inks, stamp onto the clear side of the tape and then follow the application instructions above (you know to let your ink dry fully first, right? I didn't need to tell you that, did I?) Oh, and you do stamp/transfers with tissue paper too, but you get a much different look.
- For a "ghostly" looking transfer, use an inkjet printer to create your images.
- To transfer larger images, you can "butt" the tape edges up against each to pull the ink, then do it again when putting down your image(s). Or, if you're lucky and you can find it...
- You can use the above techniques with clear CON-tact® paper for larger images!
- Oh, and YES, you can do this technique with colored copies for a really cool effect.


 Brooke Heavey


Thanks ever so!!!!! The check's in the mail, Ranon!
ReplyDeleteVery cool! Thanks so much for sharing this technique! I work with polymer clay and have been wanting to experiment with image transfers ;-)
ReplyDeleteThat's so cool! I think I'll try this in my art journal.
ReplyDeleteThanks for sharing! This technique is pretty limitless with possiblities!
ReplyDelete