


Today's post if a "sewing" tutorial, of sorts. Only it doesn't actually involve sewing. And it was created by our good friend Megan from Newly Wed Newly Bred, who is pretty much one of the funniest, most amazing people on the interwebs. Megan is sort of the Anti-mommy blogger.
A poncho for use in a car seat? Huh? Why, you ask? Well, I'll tell you
why! The quickest and easiest explanation is to just watch the video
below.
So. Big coat = bad idea. Enter the car
seat poncho! Now, there are plenty of sites that sell fleece ponchos for
kids. However, most of them are $35.99 and up. That's not really in my
budget right now. My awesome friend Kim
found a no-sew tutorial on how to make one yourself, which I was alllll
over. Because, I can't sew! Like, at all. So I needed something a
monkey could do, and this is it. It's cheap, quick, and easy! I spent
about $15 on everything. I'm sure you can get it cheaper, I didn't
really shop around or look for coupons. The fleece was 30% off at Hobby
Lobby, and that was good enough for me!
Supplies:
2 coordinating fleece fabrics. (I bought a yard of each. I then cut it down to a 36x36 square, so you could get less.)
*
Ribbon
for neck. Or you can use a piece of the scrap fleece. I can't cut
straight, so I went with a coordinating ribbon. Either works!
*
Sharp scissors.
*
Measuring tape.
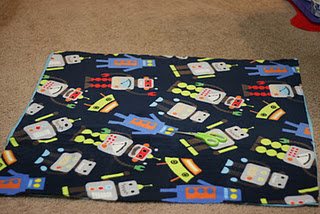
I chose a fun robot print fleece, and
then a coordinating solid for the back. This poncho is reversible! You
could use just one piece of fleece, but two is much warmer.

I laid
the fleece out and used my measuring tape to measure a 36" by 36"
square. Before I cut the square I tried to match up the fleece pieces as
well as I could, so I'd have less trimming later. I also trimmed off
the remnant edge, since it was kind of curled up. I trimmed it up as
best I could, but it was definitely not perfect. In the end, it doesn't
matter though, since it will be fringed.
Here is the finished square.
After
cutting the square, I folded one corner over to the opposite corner and
matched up all the edges. This is when I did a bit more trimming.
Again, it doesn't have to be perfect!

I
used my measuring tape to find the middle of the long edge of the
triangle. I put a small snip with my scissors there, or you could mark
it with a pen or pencil. The center is where the hole for the head will
go. I chose to find something round and 3-4" in diameter to use for the
cut out. The bowl to my Santa Scentsy warmer happened to fit the bill. I
told you, this is a fly by night kind of operation. I won't judge you
if the base of your bong happens to be the right size.
Since
the fabric was folded in half, I knew I only needed to trace half the
circle. I put the bowl down on the fabric (just half of it!) and traced
it with a pen. Because the blue is going to be the "inside" of this
poncho, I wasn't too worried about a pen mark. If you have two fun
fabrics and you do plan to use both sides, you might want to use chalk.
Or, you know, just wash it. That is one step too many for yours truly,
though.

I
then cut out where I had traced. Voila. Instant head hole. You want to
cut neatly, but exact precision isn't totally necessary. You can't tell
when it's being worn.
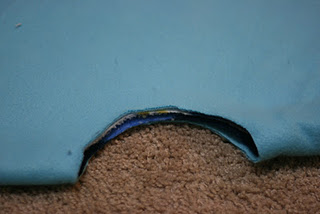
Now
enters the more tedious work. Still easy, just takes a bit of patience!
You want to fold the edge of the opening over about 1". I just eyeballed
it. This is not exact science! This is no sew for bitches like me-- who
can't thread a needle. AKA: ghetto crafting. :)
Once
you have the opening folded over about an inch or so, you are going to
put in small snips around the perimeter of the opening. At most 1/2". I
did mine an inch-ish apart. This is where you are going to weave the
ribbon or fleece strip, to keep the pieces of fleece together. Make sure
not to cut all the way to the edge. Smaller is better here. I know.
Goes against everything we know when it comes to men and things like
diamonds. But, just trust me.

This is how it looks after you have snipped, and woven the ribbon
through the openings. As you can see, mine are not all exactly even. Ok,
let's be honest. Mine aren't even at all. But you know what? It still
works! Please note: You can absolutely take more time with this project
and measure things out precisely. That is not at all my bag, and if I
tried, I would lose interest 1/3 of the way through. I am an instant
gratification girl, and I just want to get it done! Really, it's pretty
incredible that I didn't just chuck a piece of fleece at the kid and
tell him to cover up.

This is
where I kind of forgot to keep taking pictures. However, there is really
only one more step, so you aren't missing much. The fringe!!!
I
laid out the square again, and began cutting fringe along each edge. I
made my fringe about 2" in length. I didn't want to mess with trying to
cut the fringe at angles in the corners, so I cut out a 2" square in
each corner. It worked perfectly!
After
cutting the fringe (it takes a bit, but it's not too bad), I began
tying the fringe together. You can do just a regular square knot. I
actually just did a half knot. (For those of you not up on your knot
lingo, the first half of tying a shoe lace) Mostly because I'm lazy. I
figured I'll see if that works, and if they start coming undone, then
I'll go back and do the square knot. Now the poncho is woven together at
the neck, and tied together around the bottom edges!
Something
to note: The 3" opening for the head and neck looked really small. It
is NOT small. In fact, I could have done it smaller. Fleece stretches
quite a bit, so there is plenty of give. I actually tightened up the
neck some when I tied the ribbon after putting it on. And Carson does
not have a tiny head.
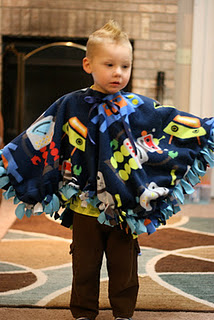
And
there you have it! Cheap, simple and easy! From start to finish it took
me an hour to an hour and a half. And as you can see from the pictures,
exact measurements truly don't matter in the end. There is nothing
wrong with doing them, but if you are like me and want it done quickly,
you can wing it and still get a great result! I'm going to test this out
in the car tomorrow!

Modeling
his "yo-bit" (that's robot, for those who aren't fluent in Carson-ese)
poncho! To use in the car, you can either put it on before getting in
the car/car seat and lift up the poncho to buckle them, or buckle them
in, and slip on the poncho after.
PLEASE
NOTE: The poncho should NOT go behind your child's back while in the
car seat. Just drape it up on the back of the seat. Since their back is
against the car seat, they will be plenty warm.


 Brooke Heavey


omg, he's so big and robottastic! how the time flies.
ReplyDelete